Hi, my name is Jennifer, and I am a rehab addict. Furniture rehab addict, that is...
I am in love with picking up free or super cheap pieces from the side of the road or garage sales, Craigslist, etc and breathing new life into them. I enjoy giving them a completely new look or just a fresh coat of paint. Sometimes all they need is a good cleaning to be used...
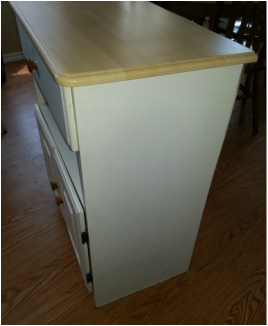
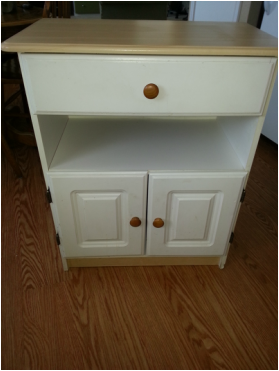
Well, yesterday on my way home, I saw this piece sitting on the curb outside a home in town, waiting for the garbage pickup. I snagged it so fast when I realized it was in perfect shape. The rollers were super smooth, the doors were in working order, it was just a little dingy and dirty like it had been sitting a while. Luckily, I had the truck with me & no husband to veto... Here are the before pictures I took for y'all to see.. Ignore the messy kitchen in the background. I was too excited about having a new project to clean the house today. :)
I am in love with picking up free or super cheap pieces from the side of the road or garage sales, Craigslist, etc and breathing new life into them. I enjoy giving them a completely new look or just a fresh coat of paint. Sometimes all they need is a good cleaning to be used...
Well, yesterday on my way home, I saw this piece sitting on the curb outside a home in town, waiting for the garbage pickup. I snagged it so fast when I realized it was in perfect shape. The rollers were super smooth, the doors were in working order, it was just a little dingy and dirty like it had been sitting a while. Luckily, I had the truck with me & no husband to veto... Here are the before pictures I took for y'all to see.. Ignore the messy kitchen in the background. I was too excited about having a new project to clean the house today. :)
So Jeremy helped me take it apart, then I cleaned the heck out of it. First I used the last of my Magic Erasers on the tough, set-in stuff. Then I used a vinegar/water mix to wash and rinse off the rest of the piece from top to bottom with all hardware removed.
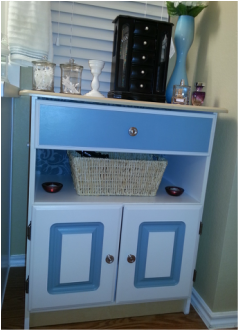
I decided that I didn't like the current knobs so we went to Lowe's right down the road, which we needed to make a trip to anyways for the supplies for another blog project (a summer water feature for the kids!!). I found some cute knobs for $1.97 each that were much more my style and bought those. I already had a sample of a peacock-teal paint that I knew I wanted to use, so I taped off the sections I wanted to paint and painted the detailed sections of the front side. SO CUTE!!!
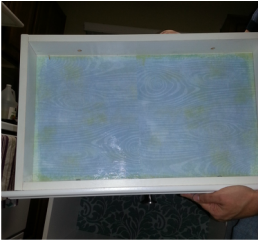
The back of the cabinet was made of that flimsy press-board stuff that you see frequently on furniture. It was starting to fall apart at the top and we knew that if we removed it at all, it would not go back on. So I decided to use some (expensive) fabric I had bought earlier this year from Joann's... I had originally bought it with intentions to use it in the master bedroom redo but that project came to a halt when I lost my job and smaller projects have taken its place. I had plenty of fabric to replace the backing and still have leftovers to make some wall art that will be made in the next week or so plus a pillow for sure for the bedroom. I love that it dresses the whole piece up a bit and makes it feel like a higher end piece of furniture.
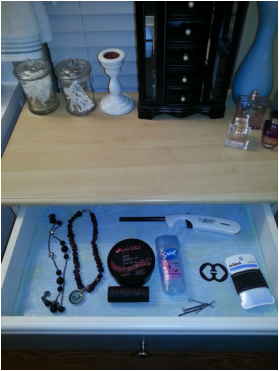
Also, the bottom of the inside of the drawer was pretty gross, so I had the idea to use scrapbook paper and mod podge (as seen on many Pinterest pins, but I have never tried it) to cover it up and make it purty!
I don't know about you, but I am ready to show the final results... Are you ready???
I decided that I didn't like the current knobs so we went to Lowe's right down the road, which we needed to make a trip to anyways for the supplies for another blog project (a summer water feature for the kids!!). I found some cute knobs for $1.97 each that were much more my style and bought those. I already had a sample of a peacock-teal paint that I knew I wanted to use, so I taped off the sections I wanted to paint and painted the detailed sections of the front side. SO CUTE!!!
The back of the cabinet was made of that flimsy press-board stuff that you see frequently on furniture. It was starting to fall apart at the top and we knew that if we removed it at all, it would not go back on. So I decided to use some (expensive) fabric I had bought earlier this year from Joann's... I had originally bought it with intentions to use it in the master bedroom redo but that project came to a halt when I lost my job and smaller projects have taken its place. I had plenty of fabric to replace the backing and still have leftovers to make some wall art that will be made in the next week or so plus a pillow for sure for the bedroom. I love that it dresses the whole piece up a bit and makes it feel like a higher end piece of furniture.
Also, the bottom of the inside of the drawer was pretty gross, so I had the idea to use scrapbook paper and mod podge (as seen on many Pinterest pins, but I have never tried it) to cover it up and make it purty!
I don't know about you, but I am ready to show the final results... Are you ready???
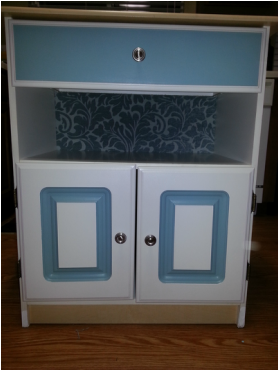
Ta da!!!!
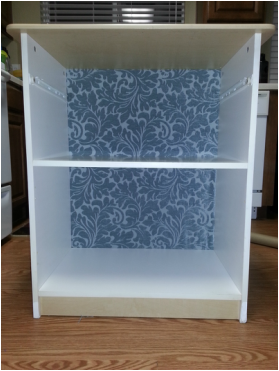
Here is a better look at the fabric. :)
The inside of the drawer - a greenish/aqua faux wood print scrapbook paper with mod podge to seal it.
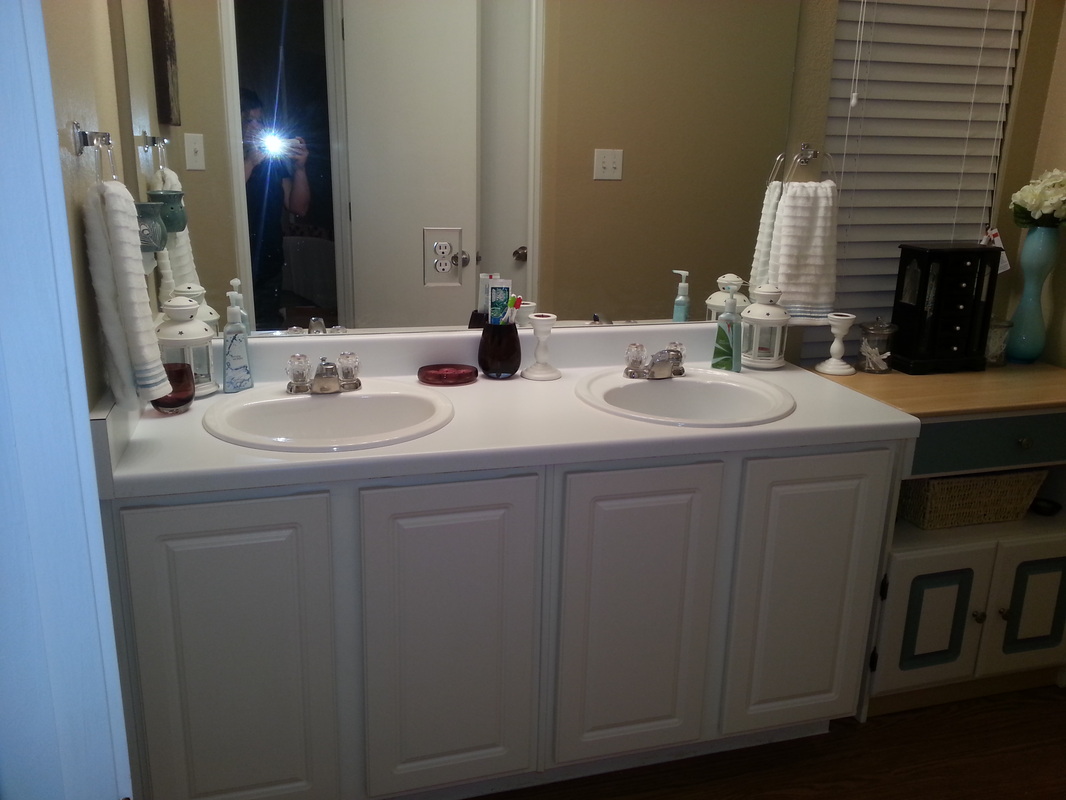
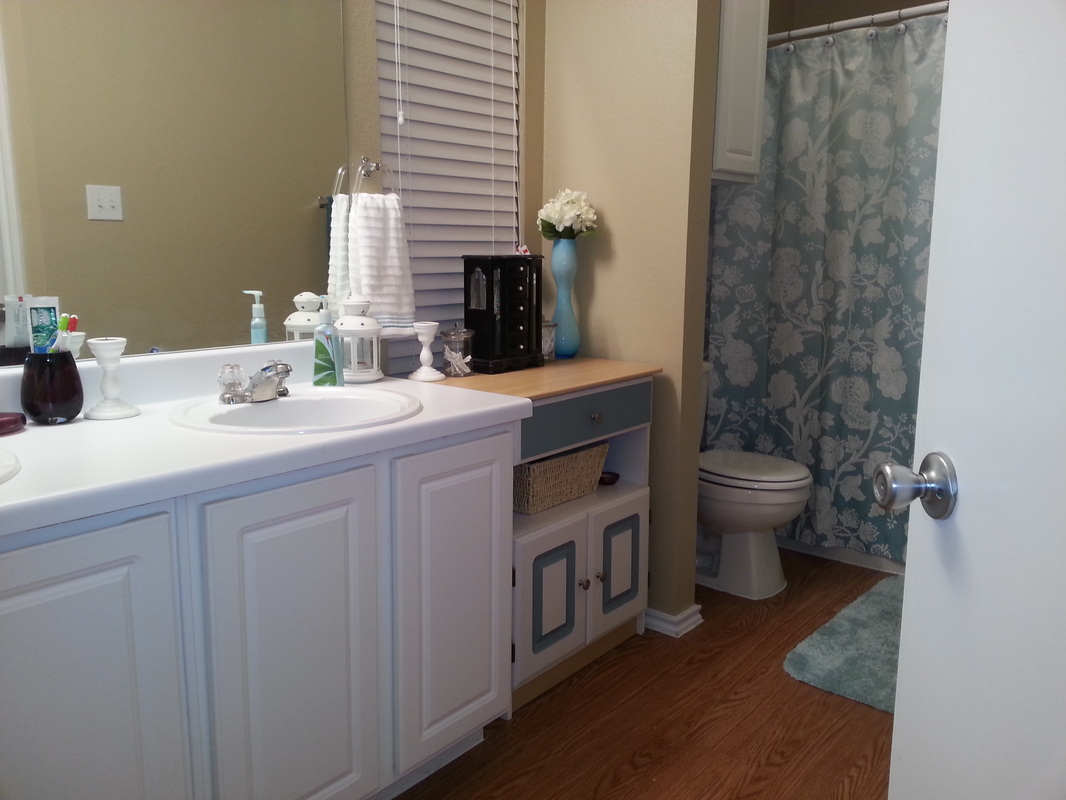
Here is what it looks like in its new home in our master bathroom.. I think it fits in very nicely, don't you?

 RSS Feed